Upgrading Your Desktop PC: A Step-by-Step Guide to Replacing Memory Sticks
This comprehensive guide will walk you through the process of replacing memory sticks in a desktop PC. By following our step-by-step instructions, you’ll gain the knowledge and confidence to upgrade your computer’s memory, improving its performance and overall functionality.
As technology advances, it’s common to find that your desktop PC’s memory (RAM) may no longer meet the demands of modern applications and software. Fortunately, replacing memory sticks is a relatively straightforward process that can significantly enhance your computer’s performance. In this article, we will guide you through each step, empowering you to upgrade your desktop PC’s memory with ease.
Precautions:
Before we dive into the process, please keep in mind the following precautions:
- Safety First: Make sure to power off your computer and disconnect it from any power source before handling any internal components. This will help prevent damage to both yourself and your computer.
- Compatibility Check: Verify that the new memory sticks you are purchasing are compatible with your motherboard. Consult your computer’s documentation or manufacturer’s website for specific memory requirements.
Let’s get started:
- Gather the Necessary Tools:
Before you begin, gather the following tools:
- Screwdriver (typically Phillips or flathead, depending on your computer case)
- Antistatic wrist strap (optional but recommended)
- Identify Memory Slot Locations:
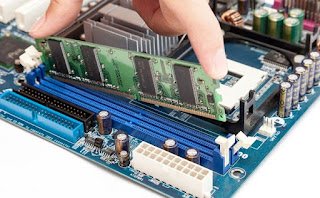
Open your computer case and locate the existing memory sticks. Depending on your motherboard, the memory slots are usually found near the CPU socket. Typically, they are long, horizontal slots with retaining clips on either end.
- Remove Existing Memory Sticks:
Gently press the retaining clips on both ends of the memory stick outward until it releases. Carefully lift the memory stick out of the slot at a slight angle. Repeat this process for all the memory sticks you wish to replace.
- Insert New Memory Sticks:
Take your new memory sticks and align them with the memory slots. Ensure that the notch on the memory stick matches the tab inside the memory slot. Insert the memory stick into the slot at a slight angle and press it down firmly until you hear a click. The retaining clips should automatically lock into place.
- Secure the Memory Sticks:
Once the new memory sticks are inserted, make sure they are firmly seated in the slots. Gently press down on the memory sticks to ensure a proper connection. Avoid applying excessive force, as it may damage the memory or the motherboard.
- Close the Computer Case:
Double-check that all memory sticks are securely installed. Close the computer case by aligning the panels properly and tightening any screws or fasteners.
- Power On and Verify:
Connect your computer to the power source and boot it up. Once the operating system loads, check if the new memory sticks are recognized. To do this, right-click on “Computer” or “This PC” (depending on your operating system), select “Properties,” and verify that the new memory capacity is displayed.
Congratulations! You have successfully replaced the memory sticks in your desktop PC, giving it a boost in performance and allowing it to handle more demanding tasks. By following the step-by-step instructions in this guide, you’ve gained the skills to upgrade your computer’s memory confidently. Remember to always follow safety precautions, check compatibility, and consult your computer’s documentation when performing any hardware upgrades. Enjoy the enhanced performance of your upgraded desktop PC!
